Sunday, February 28, 2010

Crafty Cards on the Cheap

Since crafting on a budget is such an important topic these days, I thought I'd stick with the theme on this post too, and show you how I get the most out of my supplies.

First, I started with some clearance rack cards. These were great - they were in beautiful, bold colors - pink, green and purple, and came with matching envelopes, and the best part was, they were marked down less than $2 for a pack of 12 (and these are standard size, too!).  The key to these is that I didn't find them at a scrapbook store - I found them at my local Target in the card aisle when I was doing some last minute Hallmark shopping.  I scooped up a bunch of them, even though emblazoned across the front of each was a big "THANK YOU", knowing I could put those to good use for a variety of occasions.

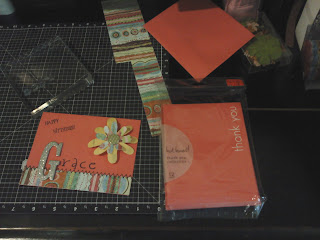
Fast forward to today.  I wanted to make a card for my sister's birthday, and I wanted it to be something special and personal.  I only had a short amount of time to do it in, so I started with the basics.  I grabbed:
  • A pack of the Thank You cards
  • My scrap paper folder (don't have one? You need one... read below to find out more!)
  • My 'occasions' caddy of stamps (I keep my stamps organized by theme, so they're easy to grab when I need them)
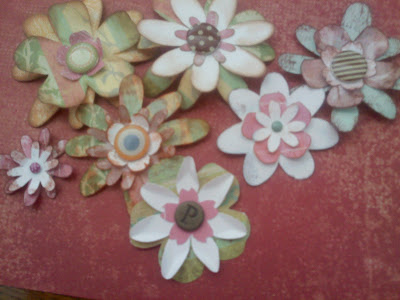
  • My new paper flowers, also made from scraps
  • and, finally, My mixed alphabet bag (read below for more on this, too).
I made the card quickly, using a scrap of paper to cover the card's printed message, using my stamps to mark the sentiment, most of her name, and to add the 'stitched' detail across the bottom.  I used a left over cardstock letter to accent her initial, and put some pop dots on the paper flower, and voila!  I was done in just a few minutes.  And, the best part - no new products were used!

Next time you start a card project, look around you for the items you've been wanting to use in your scrapping or cardmaking, and just can't seem to find a home for.  Try sorting items by like colors or patterns, and you may find a whole new life for those product misfits!

Now, back to a few of my notes above:

Scraps Folder
For all pieces of paper that are at least 12" long, OR 6" wide, I store them in a paper sorter (can find at your local scrapbook store, much like an expanding photo keeper, only larger.  Or, you could use a standard office expanding folder).  I use the dividers to sort the papers by style and color, so that they're easy to find and use for my next project.   This is the folder I looked to when making my paper flowers last week, and it's where I go for cards, scrapbook pages, tags, and other accents and embellishment uses.  I find I'm more likely to use them when they are neat and sorted than when I have them tucked here and there amongst my piles of paper, virtually lost among the stacks.

Mixed Alphabet Bag
I keep a freezer size ziploc bag full of my misfit, leftover and partial alphabet collections.  When an alphabet reaches a point that it's no longer complete enough to be useful, I tuck the leftover in here.  I keep my chipboard letters, stickers, rub-ons, die cuts and more in here.  They are great for accents like what I used on this card, to start titles in scrapbooks, or for a whimsical page, they're great for the entire title or journal, to give it a hodge-podge feel.  Just another way to stretch every last dollar out of those scrapping supplies!

Have a good week, and Happy Scrappin'!

Oh, and PS - Completely off the subject, but I got a new scrapping desk at auction this weekend (again, another bargain buy!) and I'm in love! It's cozy, and girly, and holds all my basics, and because it's a rolltop, it fits in well enough with our living room decor, I can work right there while my daughter Hayden plays!  This is going to help me get so much more accomplished!  I am having almost as much fun arranging it as I will scrapping at it!

Thursday, February 25, 2010

"I'm late! I'm late! For a very important date!"

Borrowing a line from the movie that inspired my blog name, the title of my post today is a refrain that I hear a lot from my fellow scrappers.
"I don't have time to scrap," they'll say.  "I have so many things that I need to do/take care of/plan/fix/buy/you-name-it"
And, truthfully, I understand.  Ask any my friends about booking me and my husband to do something with them, and they'll tell you - they have to reserve us weeks - sometimes months - in advance to ensure our ability to attend.

However, NEVER FEAR! my fellow scrappers!  Today I will load you up with tons of ideas, tricks and helpful hints on how to stay ahead in the scrapping game, even if you can only carve out small amounts of time to play.

Here are 3 quick ways to get layouts done in less time:

1. Use a kit! 
Sounds so simple, doesn't it?  But it really is!  Kits like CTMH's Level 1 kits give you everything you need to complete up to 6 layouts, all for only $9.95!  The colors are coordinated for you, cardstock and patterned paper are included, along with pre-arranged layout pages and some great Stickease adhesive sheets that coordinate with your papers and help you to quickly title, embellish and finish your pages!   The only thing you need to do is add your pictures, journal, and your pages are ready to go in your album and share with your family and friends!


2. Make a hybrid album. 
No, I'm not talking about digital and paper, although you can do that too.  This is even easier.  Using CTMH's  9"x9" Simply Snapshots kits make finishing an album in an evening a breeze!  Each page has space for (2) 4x6 pictures - no need to crop them! and room for journaling or a title.  They come in coordinating packs of 12 sheets, so you have enough pages to finish your book.  And, they're value-priced at only $8.95 each!  Add a coordinating Stickease pack for coordinating Embellishment adhesives, and for just $4.95, you've got everything you need for your album!

3. Come to a monthly crop.
Every month, I host a Friday night crop, giving all my scrapping gals time to catch up on their albums and their friends.  We have dinner, dessert, prizes and more, all for only a $10 cover.  You get access to my Cricut and all my cartridges (or feel free to bring your own to use), your own scrap space, and plenty of fun!

Plus, there are tons of ways to come for free!  Have a favorite dessert you want to share?  First one to volunteer to bring our dessert comes free! Have a new scrapping buddy? Bring her and you both come free her first night!  Need to stock up on supplies?  Place a $30 CTMH order and your cover is waived! 

Best of all, you get 6 hours of uninterrupted cropping time to hang out with your friends, let your hair down, and get some CROPPING done!   Make this time for yourself just once a month and you'll see the finished pages start stacking up in your albums!


I hope these ideas have helped you see how you can squeeze a little more scrap time out of your life, even amidst a busy schedule.  It's important that we all take time for ourselves now and again, and remember, scrapbooking is not just for you.   It's for your family, your children, and future generations.  It's a way of preserving precious memories and sharing your perspective on the world with those around you.  It's a wonderful gift you give those you love, so make sure you make the time everytime you can.

For more information on the CTMH product featured in this post, check out our Online Idea Book.  Check out the paper kits starting on page 14, and the Simply Snapshots are on page 31.  Contact me for more information as well, or to learn how to order.

Happy Scrappin'!

Monday, February 22, 2010

Homemade Embellishments

As much as I love and drool over the beautiful embellishments that you can find in the stores these days, there is something about the homemade variety that I will always adore.  Perhaps it's because it goes right to the heart of scrapping, for me, cataloging the times and essence of our lives. 

My latest addiction is clothing tags.  With a baby girl around, you can imagine the gorgeous styles, names and prints that accompany her beautiful little clothes.  They make wonderful embellishments, tags, fodder for titles, and more.  Even cuter are the woven tags in the back of her little outfits.  I lucked up on a lot of yard-sale clothes, which I try to keep intact, but every once in a while, a particularly rowdy dinner or overfull diaper renders the outfit unwearable for future users.   From those, I love snagging the beautiful tags for page embellishments.  Just look at the colors and patterns! 

Beach towels are another great place to steal tags from and not worry about losing the size information, FYI!


Anothe hobby I've started is collecting bottle caps.  My hubs loves Stewart's Orange Soda, and we occasionally buy Jones Soda, and I love saving the caps from all those drinks for my scrapping endeavors. After cleaning them thoroughly, I like to paint them, or cover the tops with chipboard or paper, and put a Pop-Dot behind them for a chunky embellishment on my page.  Sometimes, If I don't need that much height, I will take my crafting hammer and flatten the outer flanges, which creates a new look and still brings dimension to my pages.

These are great for adding the date to a page, to stamp or mount the first letter of a title, to use as bubbles or balloons, wheels or balls, depending on the theme of your page.  They're a wonderful place to mount flowers, or to use as the center of a large flower.  The possibilities are endless!

Share with us your favorite homemade embellishments, and we'll all have a new idea for our next crop!

Til then, happy scrapping!

Saturday, February 20, 2010

Trendy Paper Flowers

I don't know about you, but I'm ready for SPRINGTIME!  It must just be on my mind these days, but I'm seeing flowers blooming all over!  Paper flowers seem to be one of the new 'must have's' for scrappers and cardmakers -  I see them in magazines, online, in stores, and of course in Archivers - the epitome of trendiness.

For those of you like me, who love the look, but either (a) don't have the budget, or (b) prefer a handmade touch to those factory-churned designer doo-dads (or both), I have a great solution!  It's also a wonderful way to use up those beautiful paper scraps you just can't seem to let go of!

For this project, I used my Cricut and my scraps to cut a wide assortment of flower shapes and sizes. If you don't have a Cricut, no worries - use your flower punches, Sizzix, Cuttlebug or any other die-cutting tools. Or you can always cut them by hand. I used coordinating scraps, and some completely random scraps.  I even used some of the scraps where I had practice-stamped, or jotted journaling notes.  Those make excellent paper flowers!

Grab a handful of those brads, eyelets, ribbon and other assorted goodies you can't seem to find a page for, some ink pads or markers, and away we go!

Once I had all my shapes cut, I next began layering 2, 3 or even 4 shapes together to see which looked good, both from a color and shape perspective.  Once I was happy with my choices, I used various ink pads to darken the edges of the petals, giving dimension to the flower.  I used markers and inks to distress some of the plainer papers and give them some texture.  Then finally, I fretted the edges, curled petals forward or backward, and folded flowers to make them three-dimensional and at a little more 'umpfh'.   Finally, I selected a brad or eyelet or other embellishment to tie the layers together and finish it off. 

These are so simple, I didn't even need adhesive for them!  They're a great project to do in front of the TV, or to get your creative juices flowing when you're having scrapper's block on a page, or have a short amount of time or space, but just want to craft a little!

These are beautiful additions to your homemade cards, gift tags, and of course, scrapbook pages!

I hope you like these fun floral creations, and I hope they bring a little sunshine and Springtime to your crafting corner of the world! 

Happy Scrapping!

Wednesday, February 17, 2010

March Crop Night

Don't forget our monthy crop night!  A great way to get away for a little break and unwind at the end of the work week, and of course, to get some scrapping done!

Our next event will be March 5, from 6pm-12.  It includes dinner, drinks and dessert, a free welcome gift, access to my Cricut and cartridges, and your own scrap space, all for only $10!.  Plus, there will be lots of CTMH products on hand if you need to stock up on any supplies.

Click here and reserve your spot now!

When the Scraps Align...

Good morning, my happy little scrappers!

Here's a great article about "aligning" elements on your pages. It's an interesting thought to consider the next time you are searching for a layout idea. Try aligning your elements in one of the ways Debbie describes, and you're bound to enjoy the results!

Debbie Hodge's Article on Alignment

Image Credit: Debbie Hodge                                          

Tuesday, February 16, 2010

Only 12 days left on this GREAT cardstock deal!

And this deal is for a great cause, to boot!

Help the victims of the Haiti earthquake while adding to your stash! Through the month of February, purchase any of CTMH's 12" × 12" textured cardstock combo packs and you’ll get one FREE, ... and with every offer purchased, Close To My Heart will donate $2 US to Operation Smile’s Haiti relief efforts. That means for only $14.95, you get two packs of CTMH's high-quality textured cardstock (that's 48 sheets!!) and you help this urgent, important cause.

Operation Smile is always a fantastic charitable partner of CTMH's—offering free facial reconstruction surgeries to needy children throughout the world. They’ve currently marshaled their medical teams and resources to provide emergency relief in Haiti, and the donations given as part of Hearts for Haiti will be used exclusively for Operation Smile’s efforts in Haiti. For more information on their on-the-ground response, you can visit Operation Smile.

For more information on this great deal, or to place your order, email me at bonnie.k.padgett@gmail.com. Don't forget, though - this opportunity and offer are only good through the end of the month!

Monday, February 15, 2010

The First Annual Mad Scrappers Retreat!

Ladies,
I'm proud to announce the first annual Mad Scrappers' weekend retreat. Held in beautiful Ellijay, GA, it's the perfect way to get away from the hustle and bustle and get some "me" time in!

So mark your calendars now for June 11-13, 2010! Can't wait to see you there!

The weekend will be chock full of plenty of scrapping, eating, relaxing and FUN! We'll have individual work spaces, a Cricut and tons of cartridges for use, meals from Friday night through Sunday morning, super-comfortable accomodations, goodie bags, door prizes and much, much more!
Comment here if you're interested in signing up and I will send you the full information sheet via email!